 Yoosee App Docs
Yoosee Quick Start Guide
Yoosee Smart Camera Quick Operation Guide (V1.8) covering app installation, account login, adding and pairing a camera, sharing, and CMS login.
Yoosee Smart Camera Quick Operation Guide — Version 1.8
1. Download and install Yoosee for mobile phone
Search and install 'Yoosee' app from iTunes App Store (if you are using an Apple iPhone) or Google Play (if you are using the Android phone). You can also download and install 'Yoosee' software for PC Windows from http://www.yoosee.co/
You can choose and scan the QR code below to install the latest version of Yoosee depending on the type pf your mobile phone system.


2. Add device
1. Account login and registration
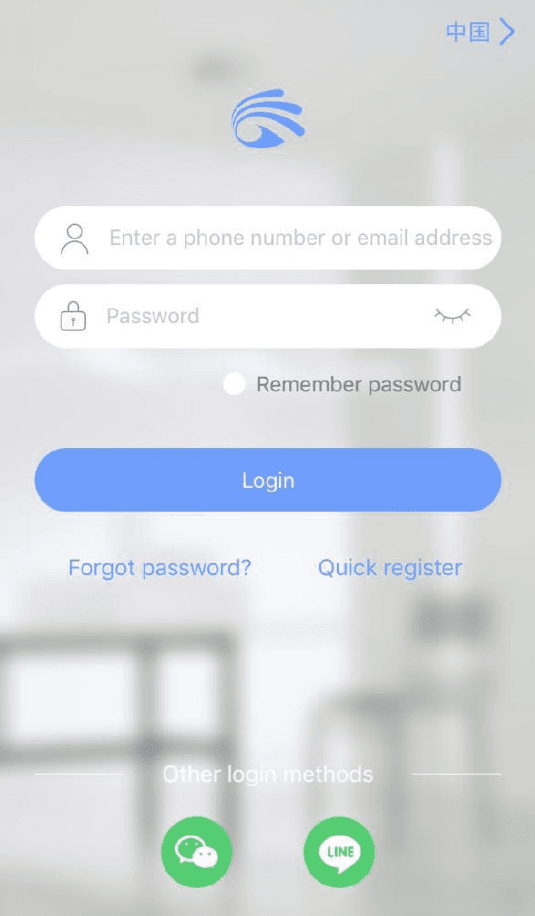
Registration: Click 'Quick register' to register a new account. You can use your phone number (Supported countries/areas for phone registration as shown below) or email address to register. (Email registration is highly recommended, because it is convenient for you to reset password for future use.)
Login: You can log in by entering an existing account and password. Or authorize login via WeChat or Line.
2. Using 'Fast Networking' to add the new device
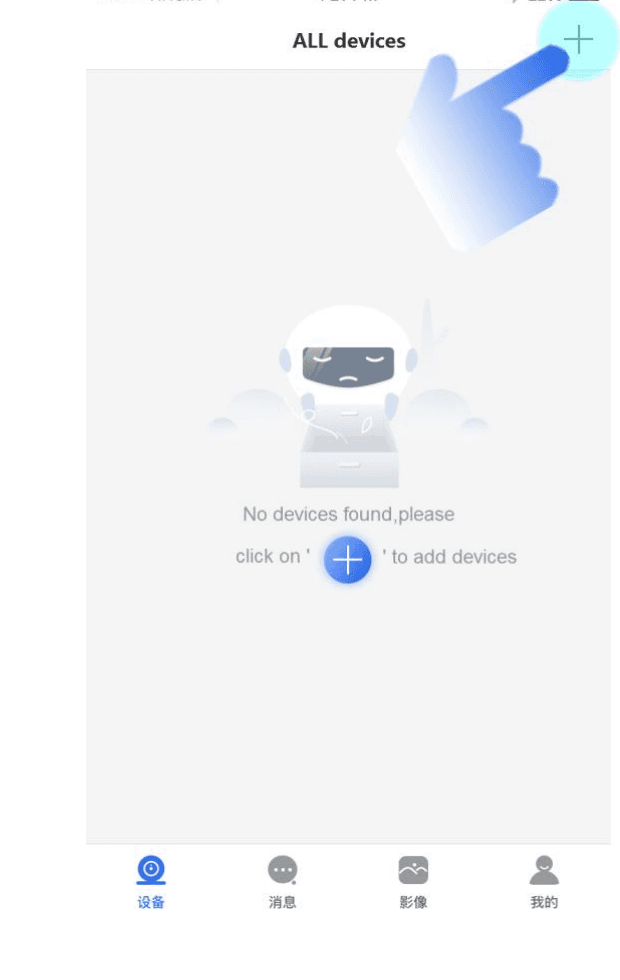
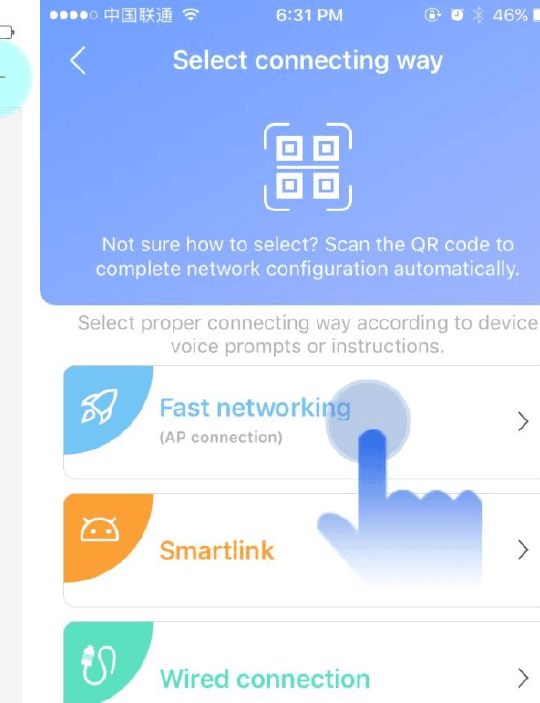
Under 'Device', click '+' at the right top corner of the device list in Yoosee to add a new device. Select 'Fast Networking'.
Note that the process to add device varies between different mobile operating systems iOS or Android.
Adding new device for iOS phone
Step 1: Prepare the device
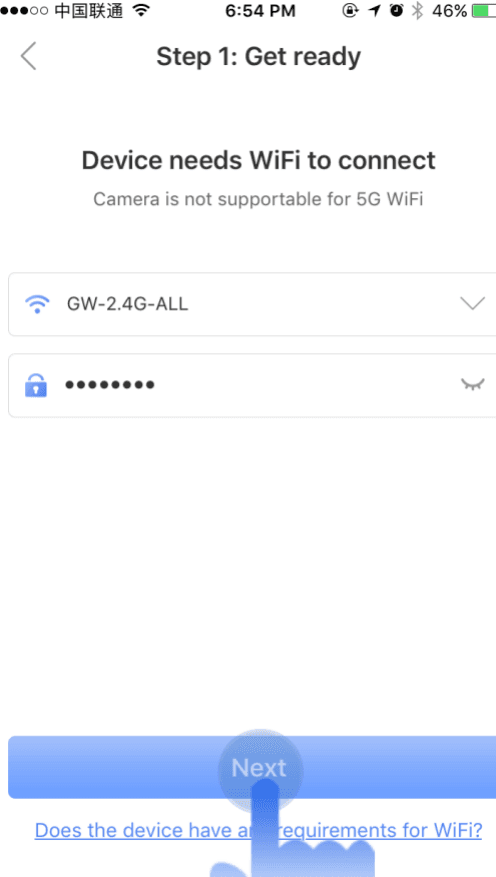
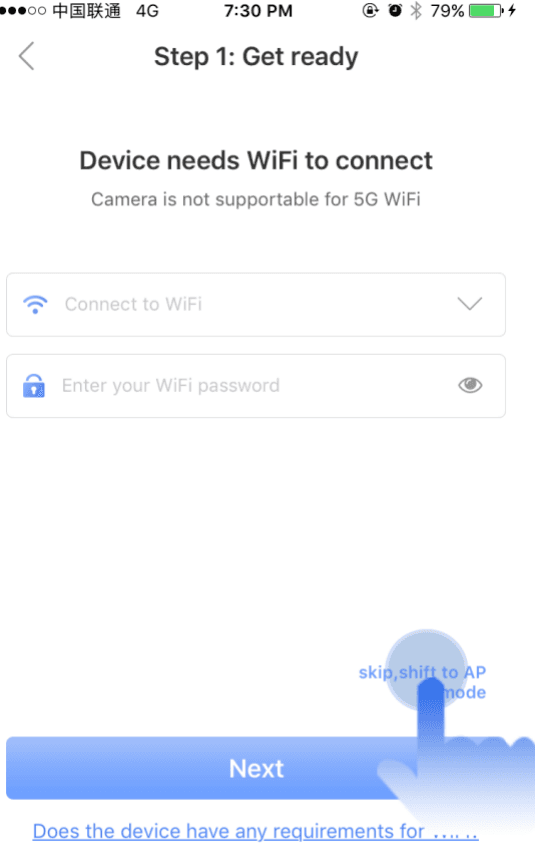
Connect your phone to the 2.4G WiFi of the router. Please ensure the device is connected to the power supply. After hearing the device prompt tone 'Waiting for configuration' and "dudu" sound, select the WiFi that the device is about to connect to and enter the WiFi password. Click the "Next" and follow the prompt of the App to begin the adding process.
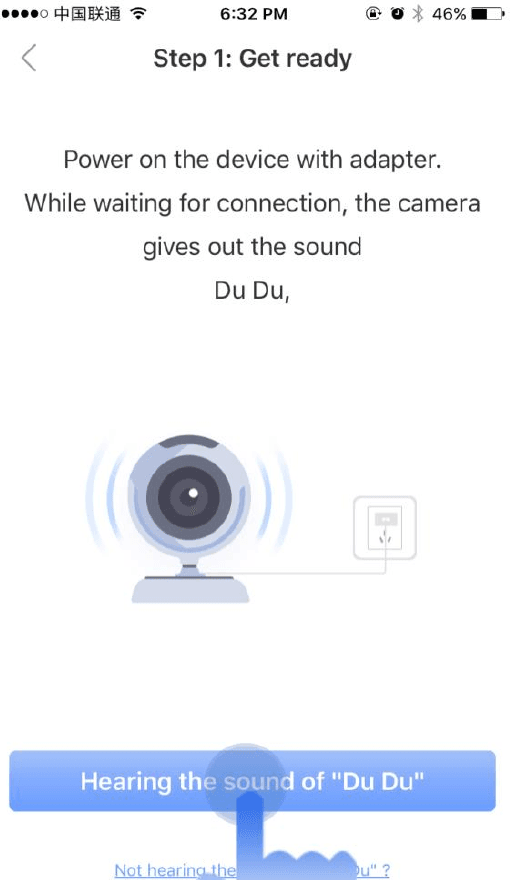
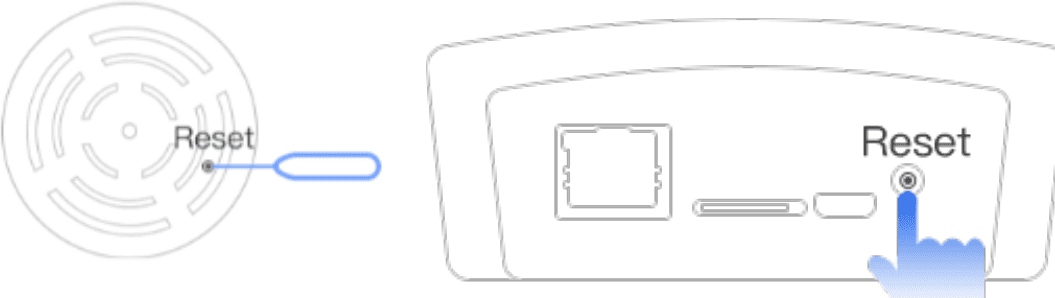
If the device still does not issue prompt tone after powered on, please reset the device (press and hold down the Reset button until you hear a "Di" sound follow by "Device to default setting"). The reset button may be on the back or bottom of the device. Some cameras have a reset button along the cords (next to the power connector)
Step 2: Connecting device
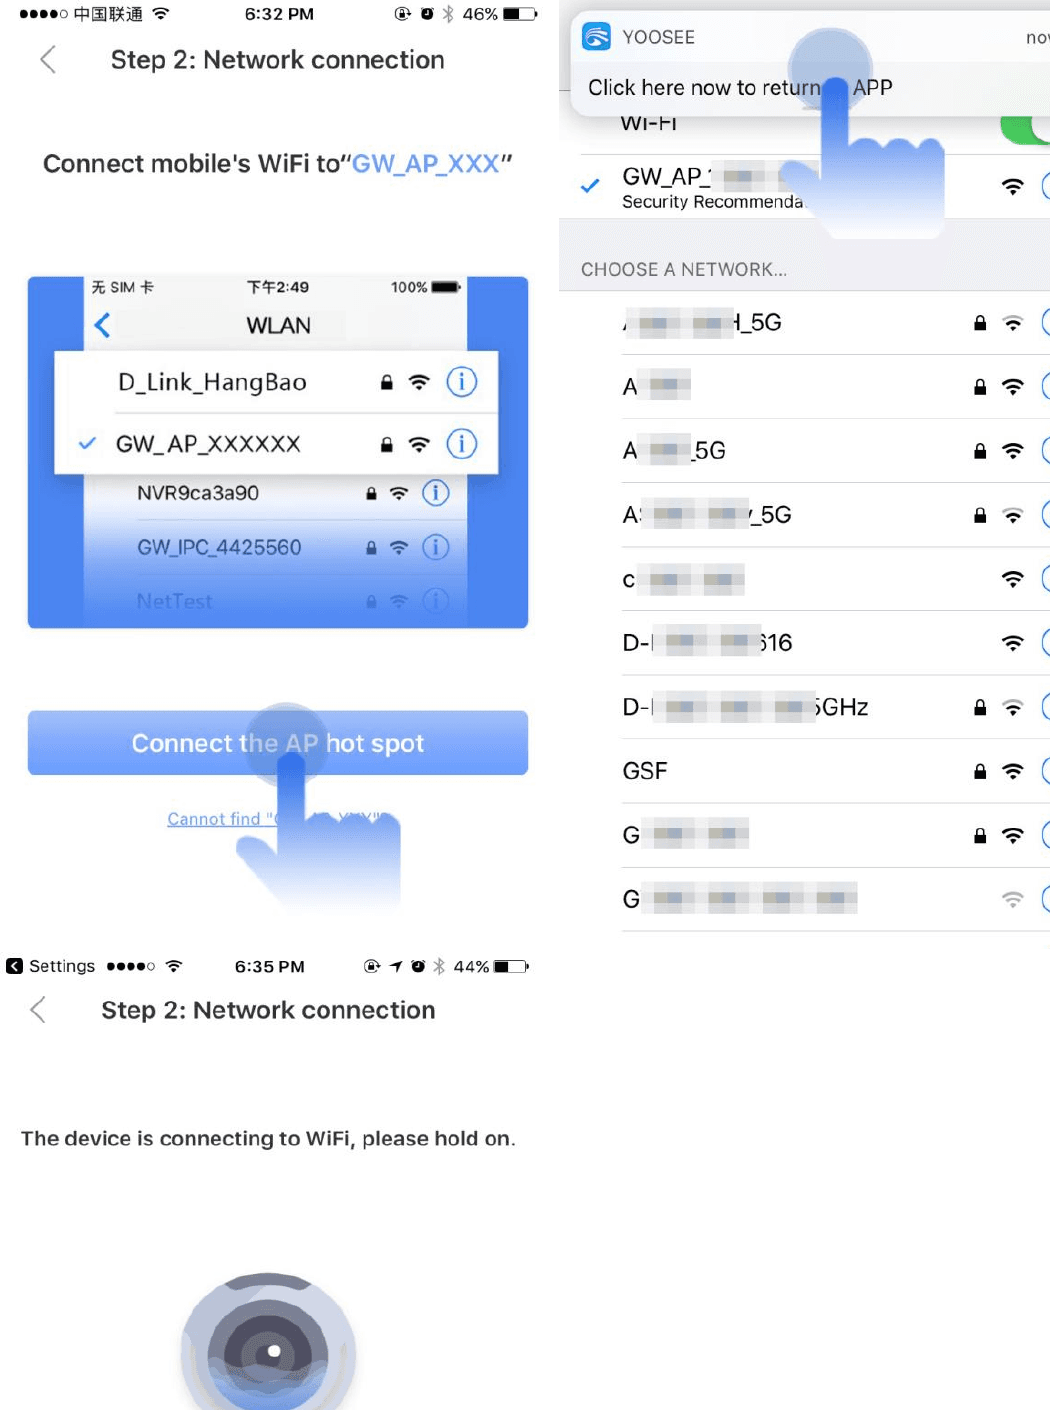
At the prompt, click "Connect the AP hot spot" and go into the Wi-Fi setting interface of the phone. Select the AP hotspot of the device (i.e GW_AP_XXXXX) according to its device ID (label is on back or bottom of device). Upon a successful Wi-Fi connection, click the prompt in the notification bar to go back to the App and wait for the device to continue to connect to WiFi. To ensure that the device is successfully connected, click 'Heard"device is online already" to proceed.
Step 3: Configure the device
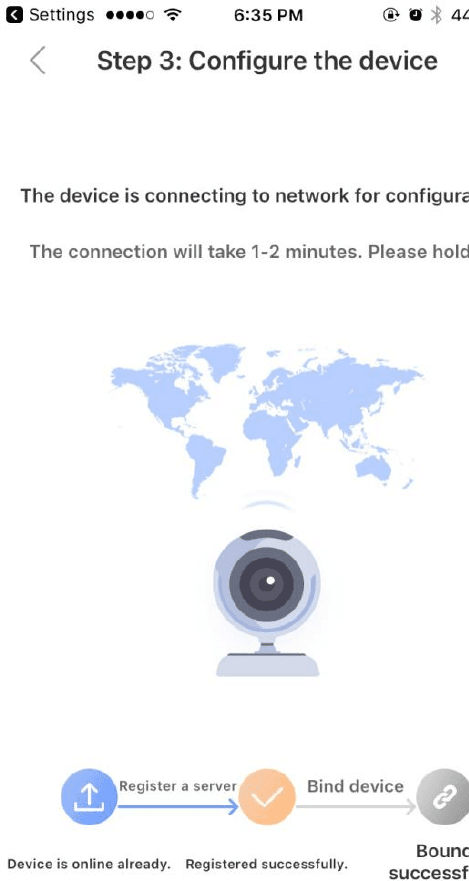
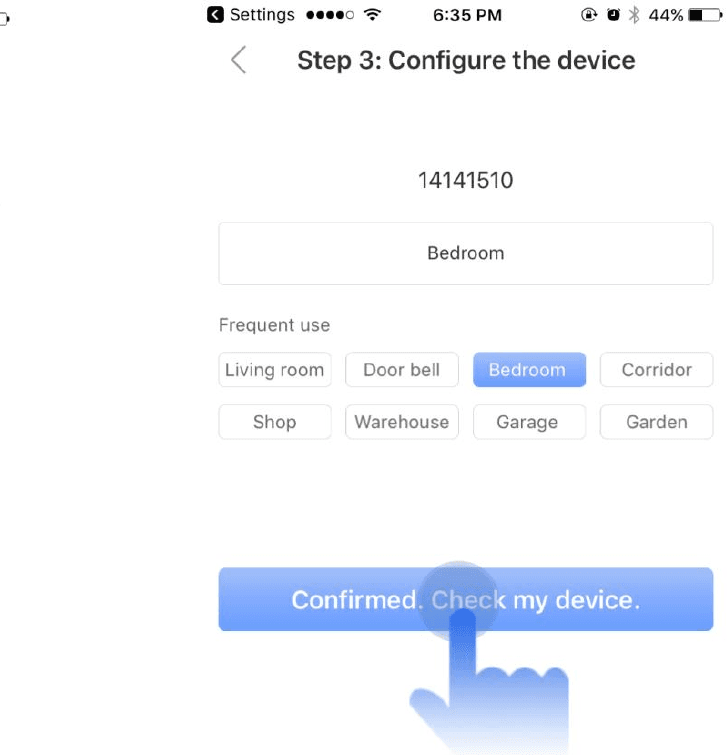
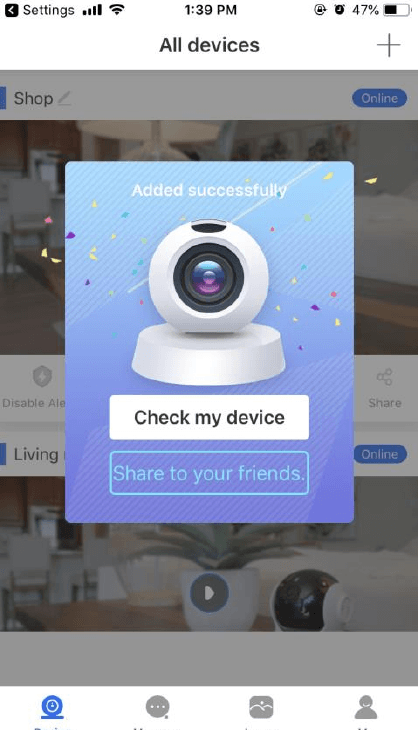
After a successful connection to the network, the process of device configuration will take place automatically. Once the configuration is completed, the device can be named by its location. Click 'Confirmed' and you will return to the device list. You will see your device name in the list and a pop-up prompt showing 'Added Successfully'.
Adding the new device for Android phone
Step 1: Prepare the device
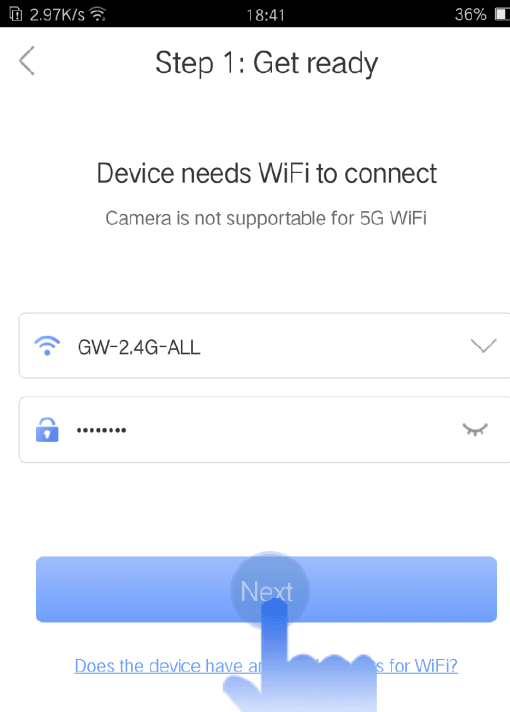
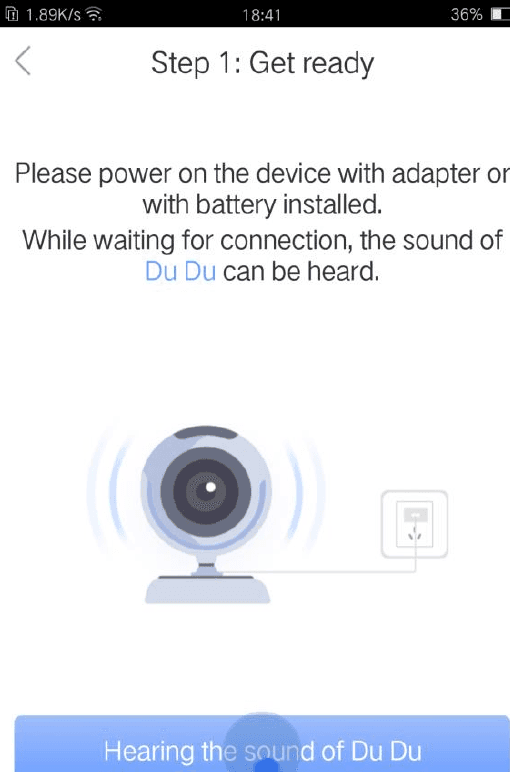
Please use the phone to connect to the 2.4G WiFi of the router. Then connect the device to the power supply and after hearing the device prompt tone "waiting for configuration" and "dudu" sound. Select the WiFi that the device is about to connect to and enter the WiFi password. Click "Next" and follow the prompt of the APP to begin adding process.
Be aware that some cameras do not have the "du du" sound. If that is the case, please skip the part by pressing "hearing the sound of du du"
If the device still does not issue prompt tone after powered on, please reset the device (long press the reset button until "di" and "device to default setting" are heard). The reset button may be on the back or bottom of the device. Some cameras have a reset button along the cords (next to the power connector)
Step 2: Connecting device
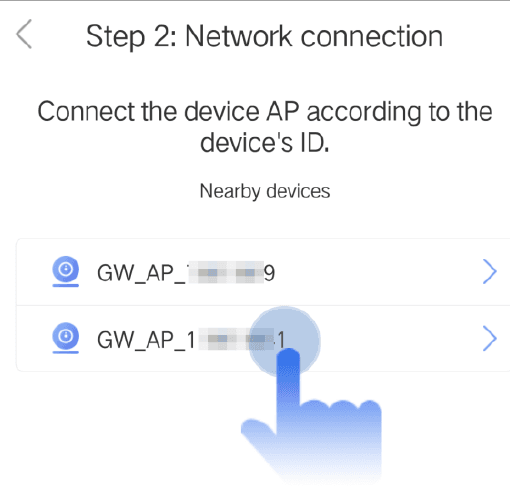
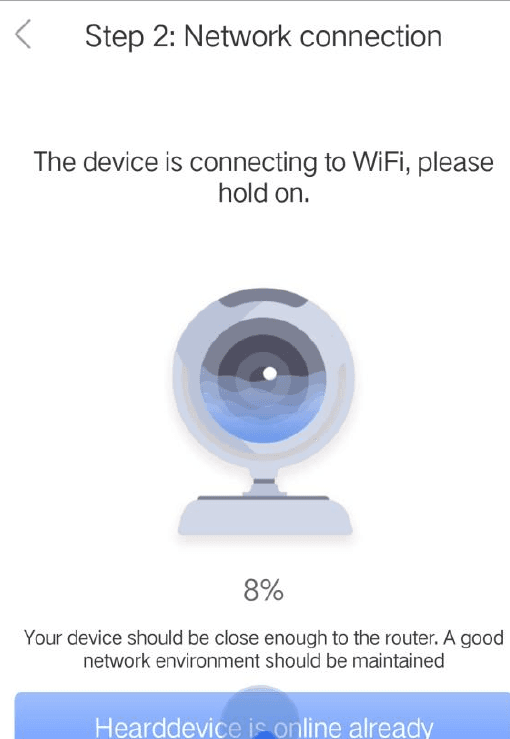
According to your device ID (Usually on the label on back or bottom of device) to select the corresponding AP hotspot in the device list and wait for the device to connect to WIFI. When connecting succeeded, the prompt "device is online already" is heard and click the prompt button to proceed to next step.
Step 3: Configure the device
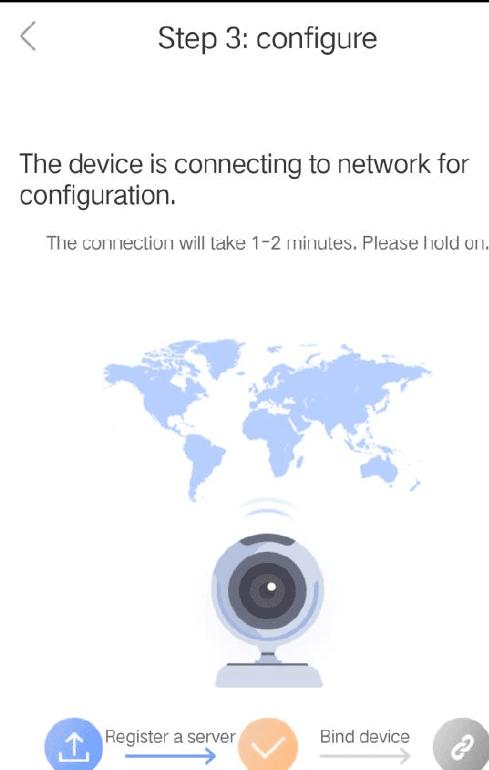
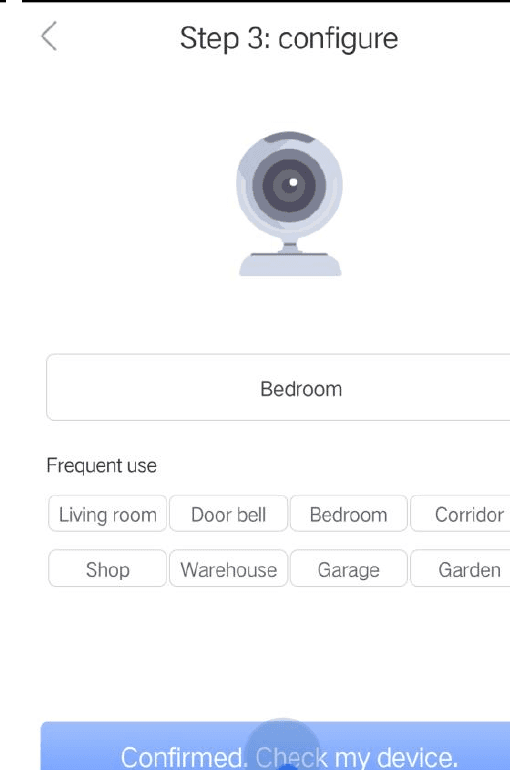
After WiFi connecting succeeds, the device will proceed to configure process automatically and the process of configuration is displayed dynamically in the APP. After configuration done, the device can be named and when click "Confirmed" to return to the device list, the pop-up prompt "Added successfully" is displayed.
3. Sharing device
The device is added successfully after following the above steps. Then you can use the sharing function of the device to share the video with your friends and family. Friends and family need to download the Yoosee App first, then sign up to log in. You can click the "share to your friends" in the pop-up windows or click the right top corner icon of the device. Then select the way you want (Enter friends' mobile phone number or email which is registered, face to face share, WeChat share) to complete sharing.
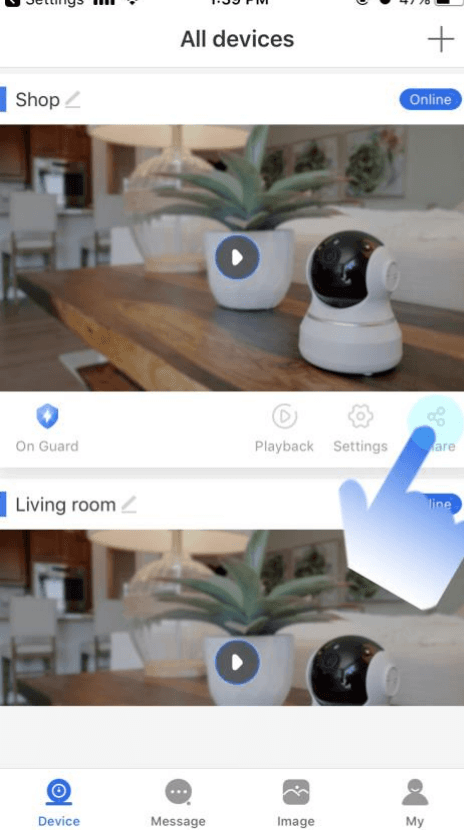
Once you've entered "Share Management", you can choose how you want to share.
Method 1: Account sharing. Enter the Yoosee mobile phone number or email address that your friends and family have registered. Click the search button on the right to confirm that the account exists, click "Share" and confirm. After the friends and family receive the invitation notice, click on the message in the message center to confirm the reception and share, then the device can be accessed.
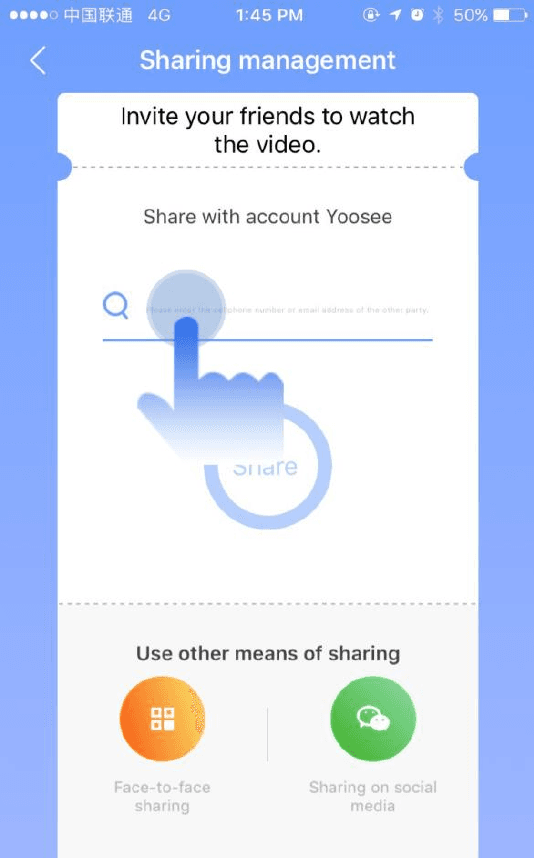
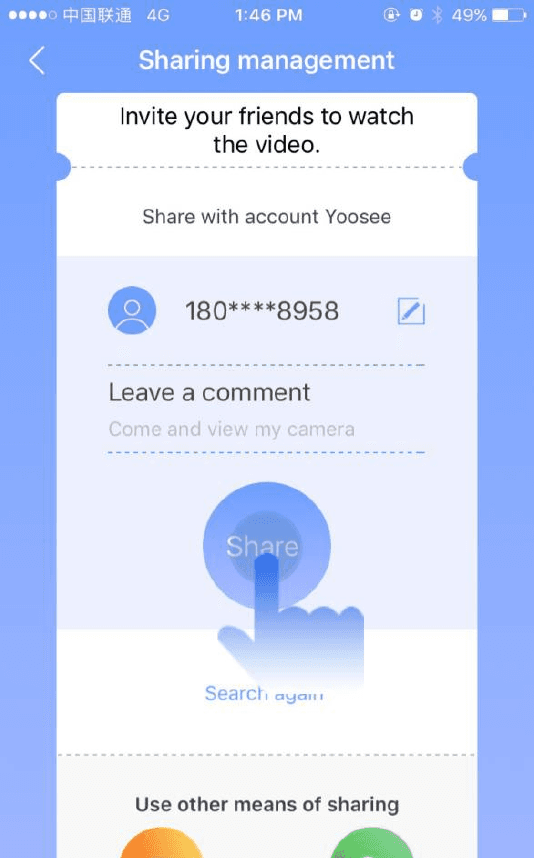
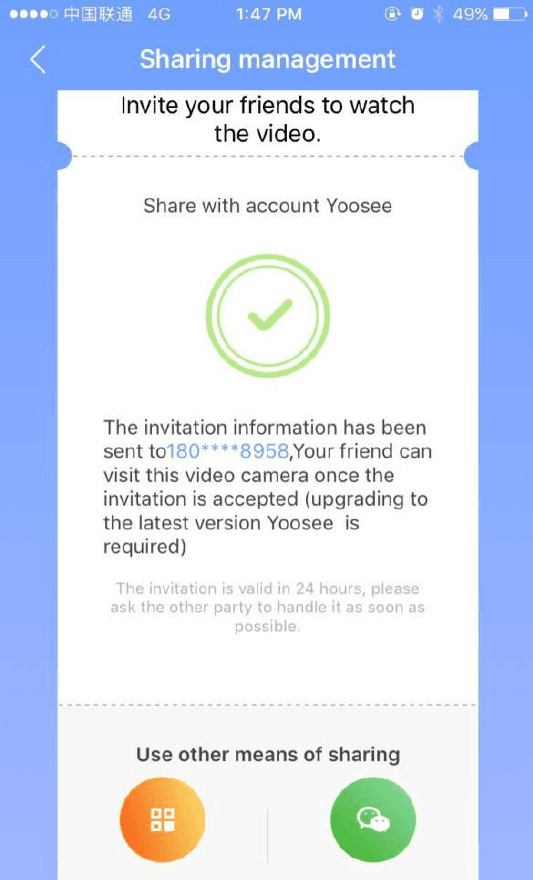
Method 2: Share face to face. Click "Face to Face Sharing" in the lower left corner of "Share Management" to display the QR code to your friends and family. friends and family log in to Yoosee, click "Scan" in the upper left corner of "Device List" to scan the QR code. After identifying the information, click "Connect" to access the device.
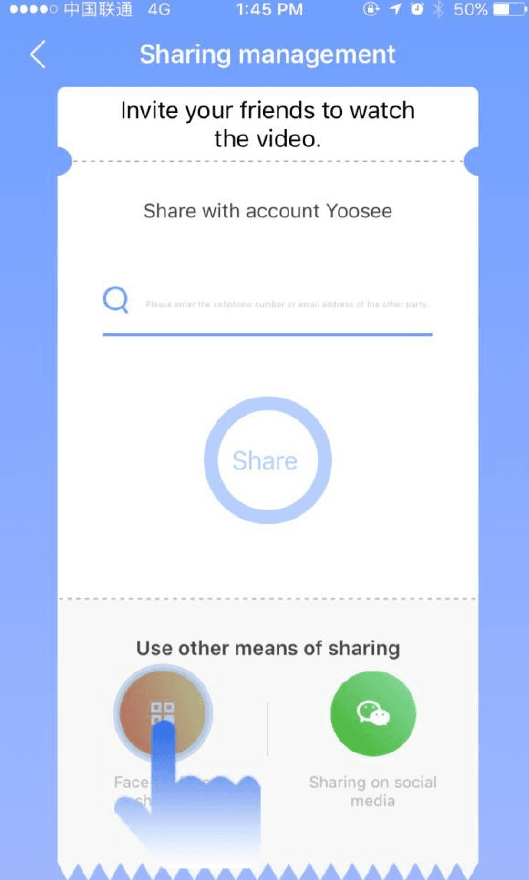
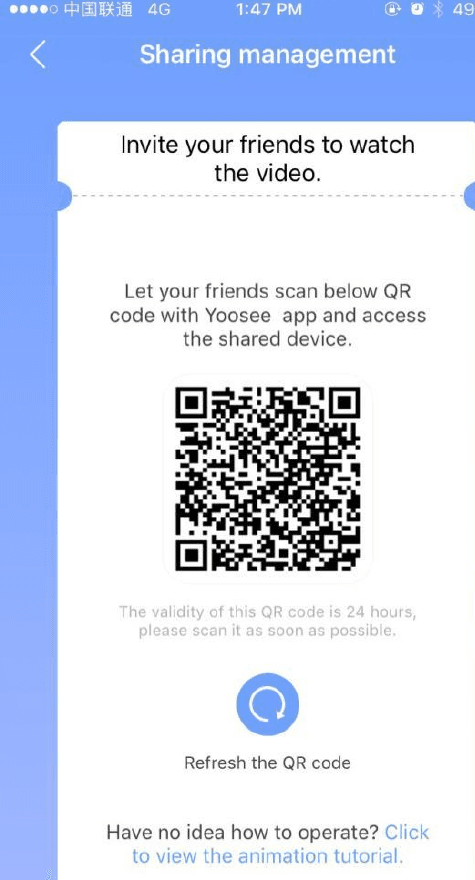
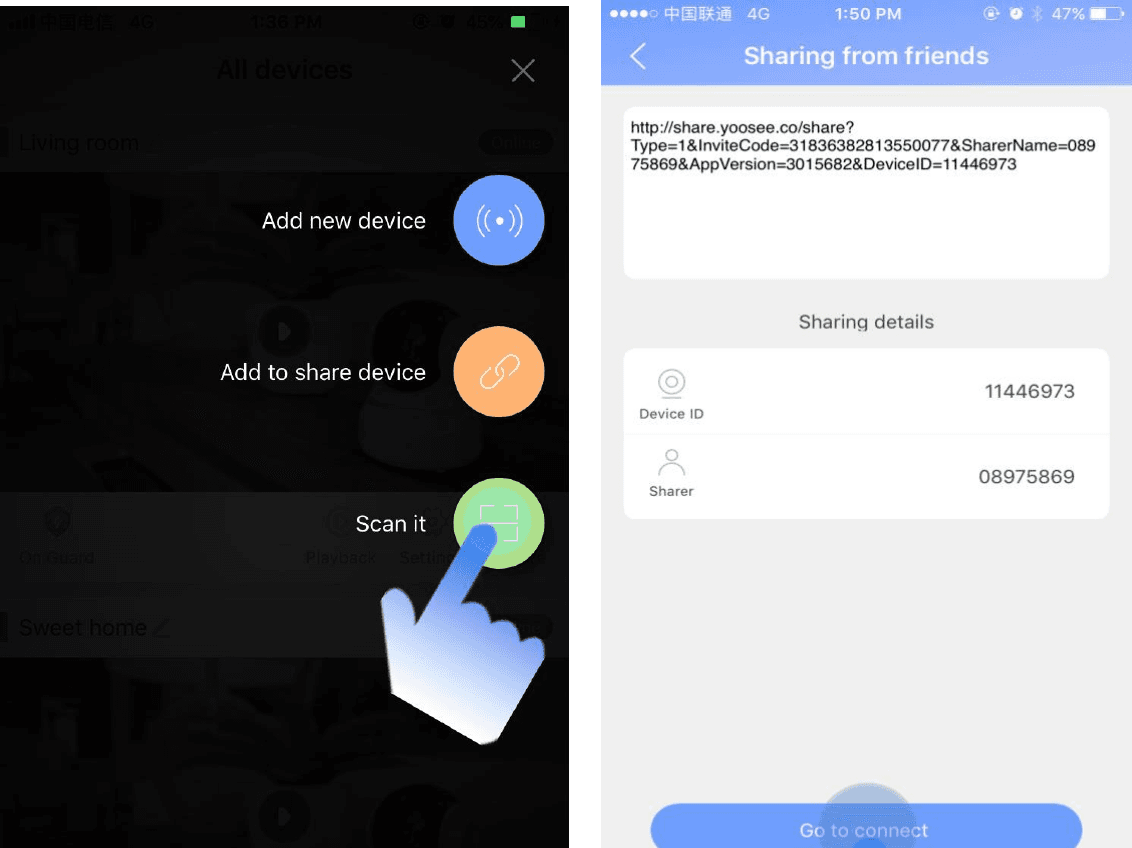
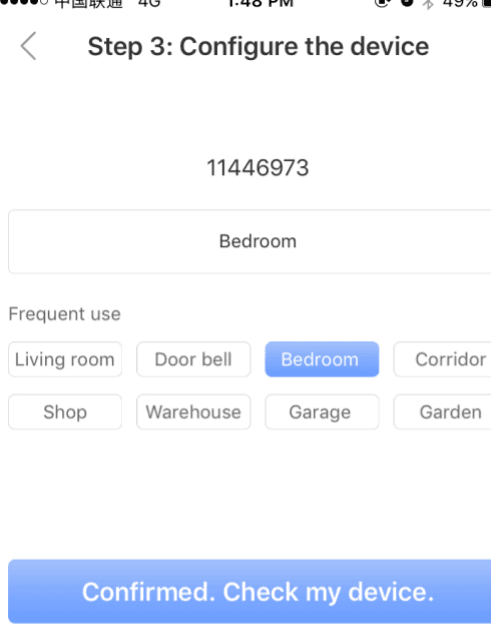
In addition, you can also click "Social Tools Sharing" to share.
4. Other ways to add
Wired Connection
Advantage: The network quality is more stable than WIFI. The videotransmission quality is secured.
Condition: (1) The device has a network cable interface. (2) Have a long enough network cable connecting the router to device.
Operation: (1) Connect your phone to WIFI of your router first, after the device connected to power, plug the cable into network port of the device, the other end connect to LAN port of the router. (2) Choose "Wired Connection" in your APP, select the device at the "new device list" for further configuration, name the device (If the device is configured with a default password, you need to input it manually). Confirm saved to add the device.
AP mode
Advantage: When there is no router and network available, the camera can connect through device hot spot.
Condition: Mobile phone and the device must be close to each other, generally within 15 meters.
Operation: (1) Long press the reset button until the device prompt "reset to default setting" is heard. (2) Connect mobile WiFi to the AP network of device (Generally GW_AP_XXX). Return APP after connected, click "skip, shift to AP mode". After confirmed to connect, the camera can be accessed without internet.
5. Download and login CMS on computer
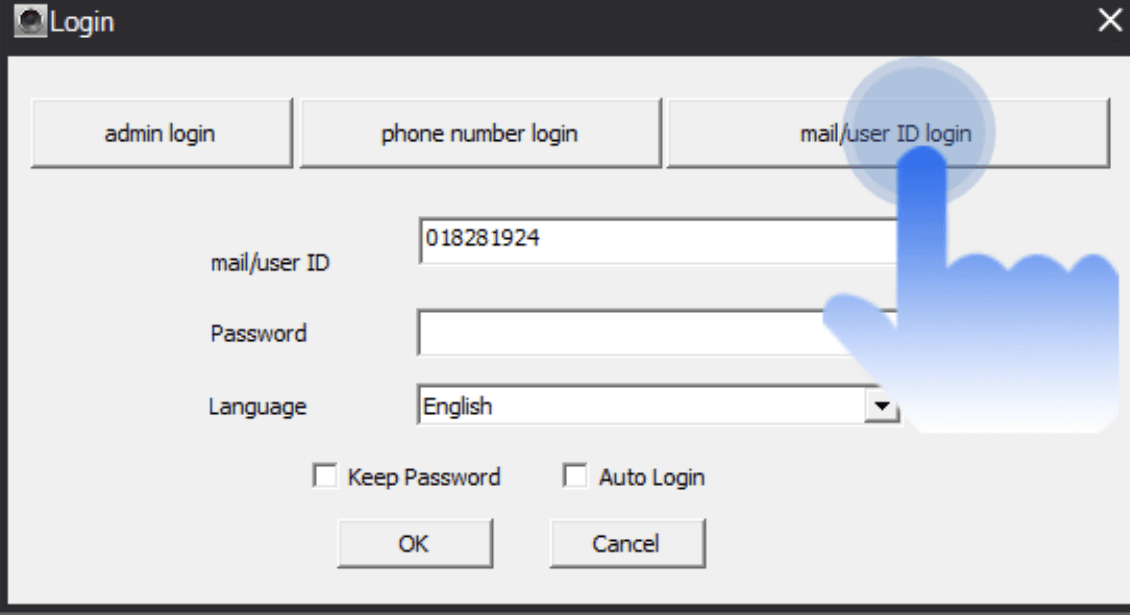
Please go to http://www.yoosee.co/ to download and install CMS. After successful installation, log in with your Yoosee account to view device monitoring on your computer.
6. Frequently asked questions
"Device is offline" is promoted in the device list
A: Please check if the camera properly connected to the network, check whether the indicator light is always on. Please check if router normal.
What should you do when the APP of mobile phone cannot receive the push notification.
A: Check whether alarm and alarm push notification are turned on in the alarm setting and confirm to set "Defense". Meanwhile check the Android phone background progress whether it's forbidden by system or anti-virus software.
How to do with motion detection false alarm.
A: Update firmware version (above 14.0.0.76) and APP (above 00.46.00.13), adjust the sensitivity in the setting of the device; Also can adjust through configuration file by changing: md_level = 3 (1~6, smaller numbers more sensitive).
Failed to search video file when playing video.
A: Please check if SD card damaged; please check the search time of the video file, and check the system time of the camera.
The camera cannot connect to WiFi.
A: Please check whether the password of WIFI is correct. Ensure the WiFi is 2.4G cause the device does not support 5G network. The router does not limit WiFi access such as AP isolation, anti-freeloading and so on. Some phones need to provide targeting rights and turn on targeting to get a list of WiFi.
Cannot find the AP device in the WiFi list of the mobile phone.
A: The firmware version does not support. Mobile phone and device are too far away.
7. Request more information
This quick operation guide will guide you to use your IP camera quickly. For further information, please contact the customer service on email.